The latest Windows 11 23H2 from Microsoft brings many new features and improvements. Regular Windows updates can patch recent security issues and errors, optimizing the overall system performance. However, there might be issues such as failure to boot, crashing upon startup, or automatic restarts on Windows 11.
There are various reasons for startup problems on Windows 11, such as corrupted system files, update errors, virus or malware infections, outdated drivers, or disk drive errors.
Today, we’ll discuss some methods to fix common Windows 11 issues.
Note: If your computer keeps crashing and is unable to perform any tasks, it’s advisable to start Windows 11 in Safe Mode and apply the solutions listed below.
1. Install the latest Windows 11 updates
Microsoft regularly releases Windows updates that contain the latest security enhancements and fixes for previously reported issues by users. Whenever you encounter issues with the Windows system, check for and install the latest Windows updates. These updates not only address problems but also optimize and speed up the system.
Check for Windows updates:
- Press the Windows key + I to open Windows Settings.
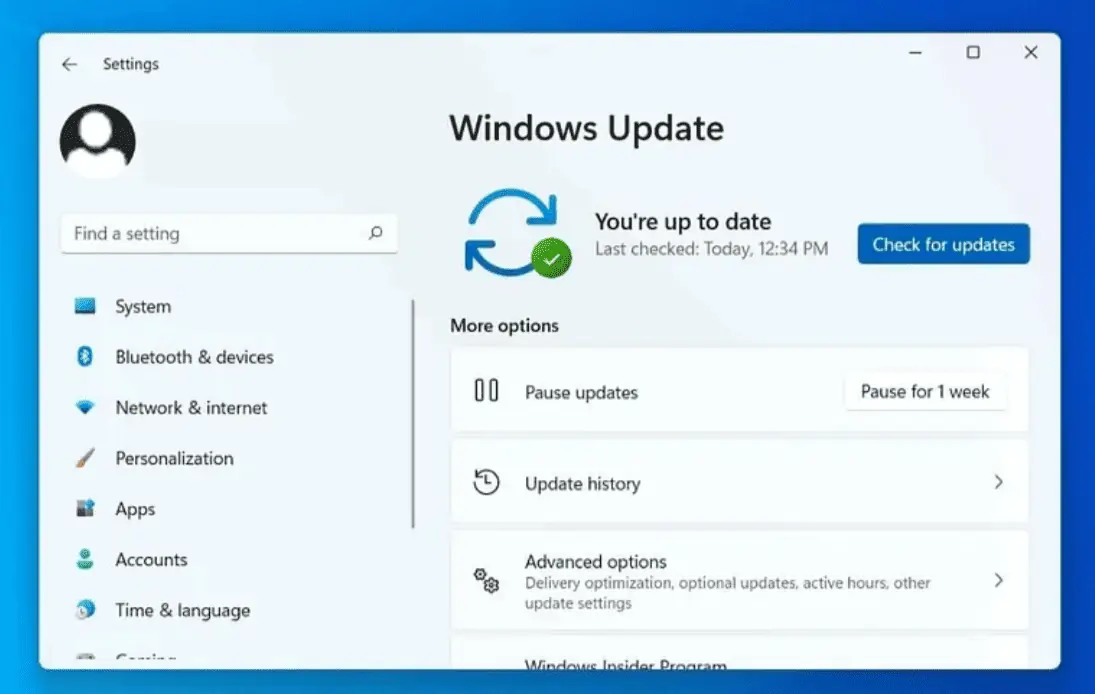
- Select ‘Windows Update’ and then click on the ‘Check for updates’ button.
- If there are pending updates, allow them to download and install on your computer.
Find optional updates:
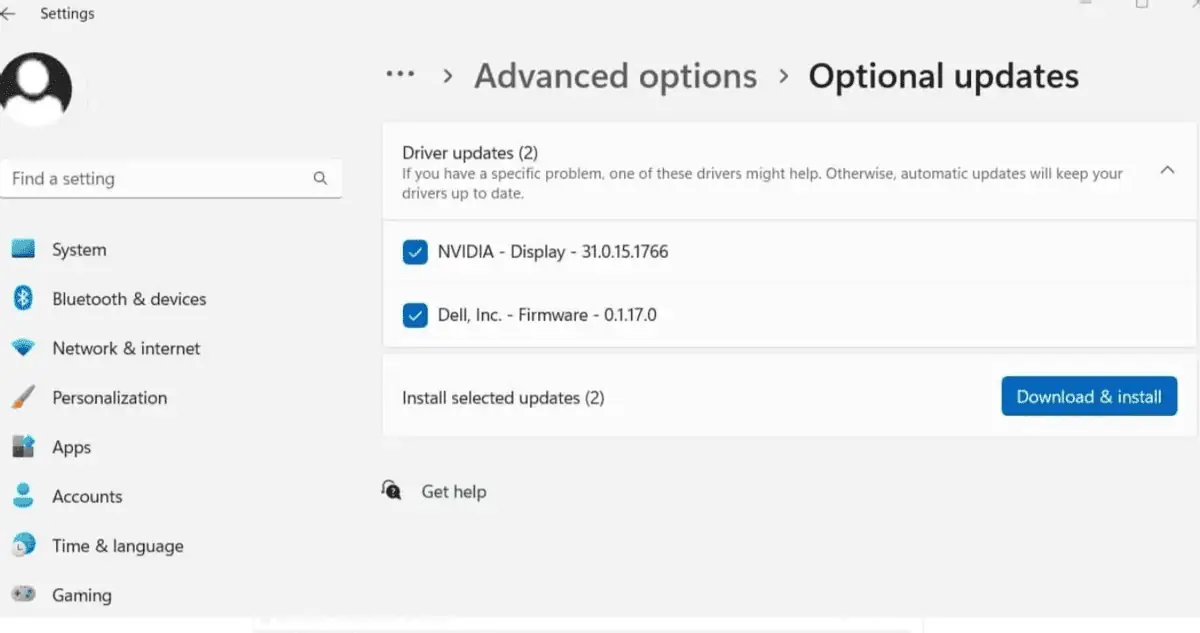
- Click on ‘Advanced options’ and select ‘Optional updates.’
- Expand the section for driver updates. If there are pending driver updates, select that section, then click on ‘Download and install.’
Afterward, you’ll need to restart your Windows 11 computer to apply the latest updates.
2. Repair damaged Windows system files
Corrupted or missing system files on your computer are another common reason for Windows 11 to become unresponsive when opening applications, displaying errors, or taking a long time to start or shut down.
Running the System File Checker (SFC) utility and the Deployment Imaging Service and Management (DISM.exe) command can be highly beneficial.
Run System File Checker:
- Press the Windows key + S and type cmd, then right-click Command Prompt and select ‘Run as administrator.’
- Run the command sfc /scannow to initiate a scan of all protected system files on your computer.
- If any issues are found, the utility will automatically replace corrupted files with cached copies located in the %WinDir%\System32\dllcache folder.
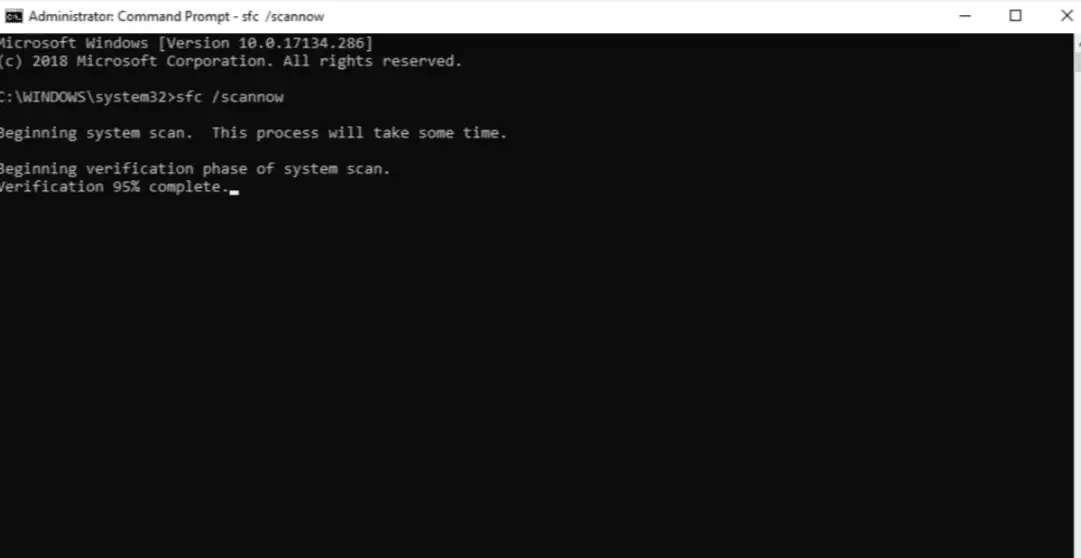
After the scan is complete, review the scan results. If it indicates that no integrity issues were found, your system doesn’t have any missing or corrupted system files, and no further action is required.
However, if the SFC scan results identify damaged files that it couldn’t repair, in such a case, you’ll need to run the DISM RestoreHealth command to fix the system image, enabling SFC to complete its operation.
DISM RestoreHealth command
Again, open Command Prompt as an administrator and run the following command:
DISM /Online /Cleanup-Image /RestoreHealth
3. Device Driver Updates
Device manufacturers regularly update their driver software to ensure compatibility, fix errors, and optimize performance. Outdated or older drivers, especially essential drivers like graphics cards, sound cards, and network adapters, might lead to issues such as automatic restarts with blue screen errors, black screens upon startup, very slow or unresponsive systems, slow booting or shutting down, and more.
You can update drivers using Device Manager, visit the device manufacturer’s site for the latest driver versions, or opt for third-party driver update software to automate this process.
Updating drivers in Device Manager:
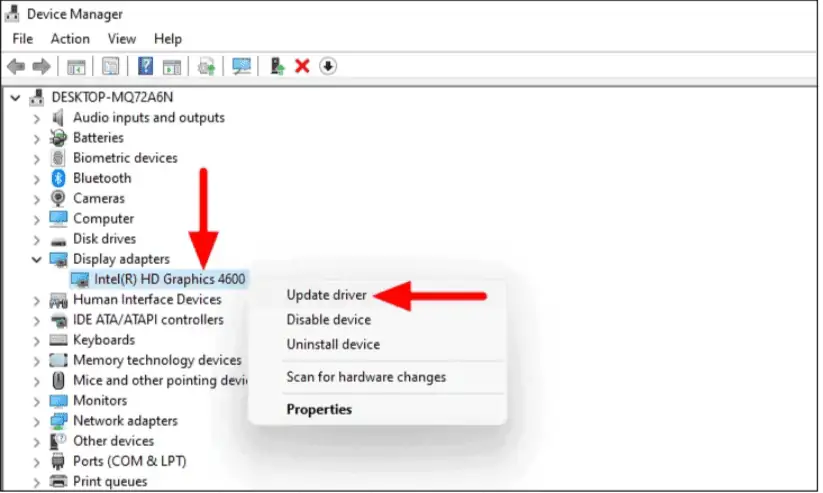
- Press the Windows key + X and select Device Manager.
- Locate the driver, for example, expand Display adapters, right-click on the installed graphics driver, and select the ‘Update driver’ option.
- Next, choose ‘Search automatically for updated driver software,’ or you can use ‘Browse my computer for driver software’ to locate the driver on your local drive.
- If you select the first option, Windows will automatically find updated drivers on your computer, or check Windows Update for the latest available drivers and install them on your computer.
Download drivers from the manufacturer’s website
Additionally, you can download and install the latest drivers directly from the device manufacturer’s website. For example: updating NVIDIA graphics card drivers.
- Visit the official NVIDIA website,
- Navigate to the download section, choose the product type and operating system, then click on ‘Search.’
- Download the latest NVIDIA graphics card driver for your computer, then double-click it to run and install it on your computer.
4. Fix Disk Drive Errors
If you notice your computer becoming significantly slow, experiencing frequent crashes, getting stuck on blue/black screen freezes, or having slow processing and booting speeds, these can all be symptoms of disk drive issues or increased bad sectors on the hard disk drive. To address this, you’ll need to use the chkdsk command to fix disk drive errors.
Run Check Disk command:
- Press the Windows key + S and type cmd, then right-click Command Prompt and select ‘Run as administrator.’
- Running the chkdsk command only scans for disk errors but doesn’t repair them.
- To locate and repair disk errors, we need to use additional parameters with the chkdsk command. You can use the command chkdsk /? to view the parameters.
- /F: Fixes errors on the disk.
- /R: Locates bad sectors and recovers readable information.
- Additionally, if necessary, you can add /X to force the volume to dismount first.
- The command to fix disk errors is chkdsk C:/f /r
Note: C is the drive letter where you want to scan for errors.
5. Perform System Restore
If the above steps fail to resolve issues on your Windows 11 PC, you can attempt the System Restore feature. However, this feature can only be used if you have previously enabled system protection. Once enabled, Windows 11 creates a snapshot of your computer’s current working state and saves it as a restore point. When problems arise, you can perform a system restore to revert the system to its previous working state.
To perform a system restore:
- Press the Windows key + R, type rstrui.exe, and press OK.
- By default, select the recommended restore option and click the ‘Next’ button to proceed (you can also choose a different restore point there).
- Click ‘Next’ again and then click ‘Finish.’ This will restart your Windows 11 to initiate the system restore process.
6. Boot Repair
Sometimes, you may encounter situations where the system fails to boot properly. This could be due to corrupted system files or issues with the Master Boot Record (MBR).
To perform a boot repair:
- We need to run the system installer and choose the ‘Repair your computer’ option from the popup window.
- In the next window, select the Troubleshoot option, then choose Advanced options. Click on Startup Repair in the following window.
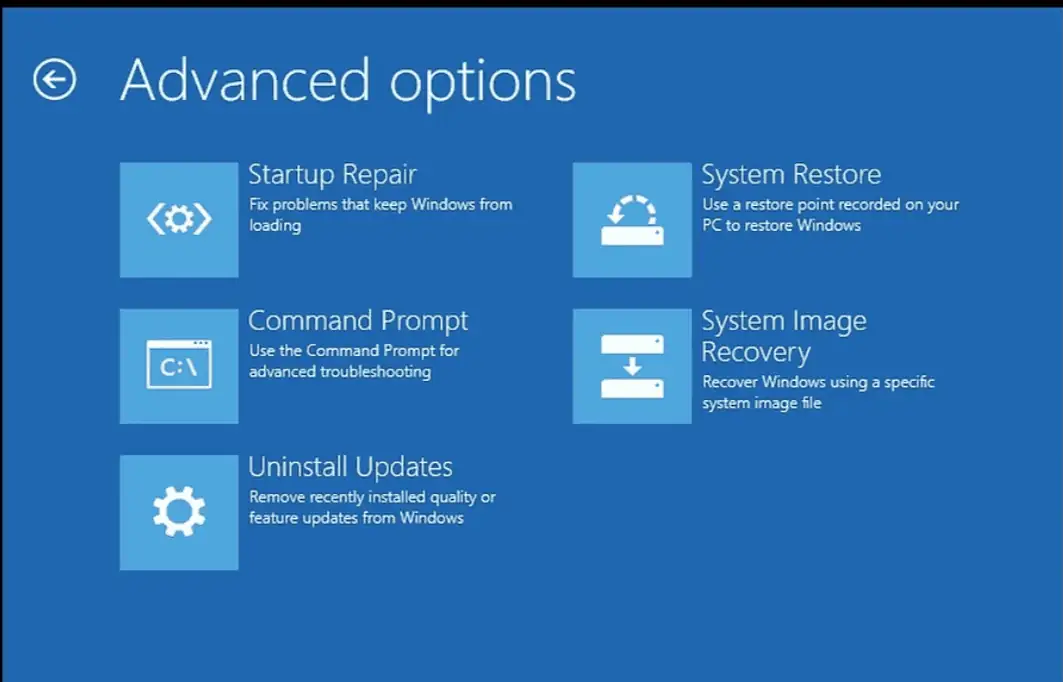
- It will restart your computer, scan, and search for missing or corrupted system files and other issues, repairing the necessary files required for booting the operating system.
Repair the master boot record
The startup repair couldn’t resolve the issue, and Windows 11 failed to start properly. You need to check the Master Boot Record (MBR) file and repair it by running the following commands.
Access the advanced options again, then click on Command Prompt and run the following commands:
- Bootrec /fixMbr
- Bootrec /fixBoot
- Bootrec /RebuildBCD
- Bootrec /ScanOS
After completion, restart the computer and check if the system starts normally this time.


