
Computer startup failure is a common issue, and I believe many users have encountered it. So, why does the computer require pressing F2 every time to enter the system during startup? Below, I’ll provide the method to resolve the issue.
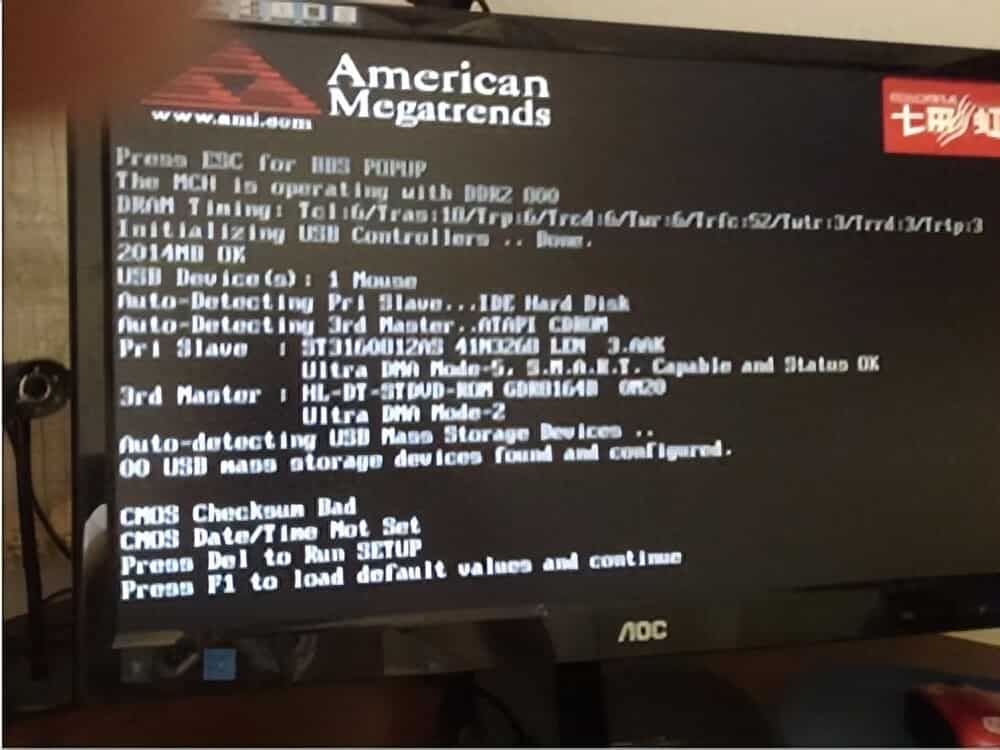
If it’s only about this issue in the picture, there are basically two possible scenarios for its occurrence.
01
There is no Floppy Drive, but It Is Set to Boot
① Some old motherboards may not have a floppy drive installed, but the BIOS still has the floppy drive enabled. This will cause the computer to fail to detect the floppy disk drive during startup, prompting you to press ‘F1 or F2’ to enter. To access the BIOS settings when the computer starts up, press the DEL key, then select the first option, ‘Standard CMOS Features,’ and press the Enter key as shown in the following image.

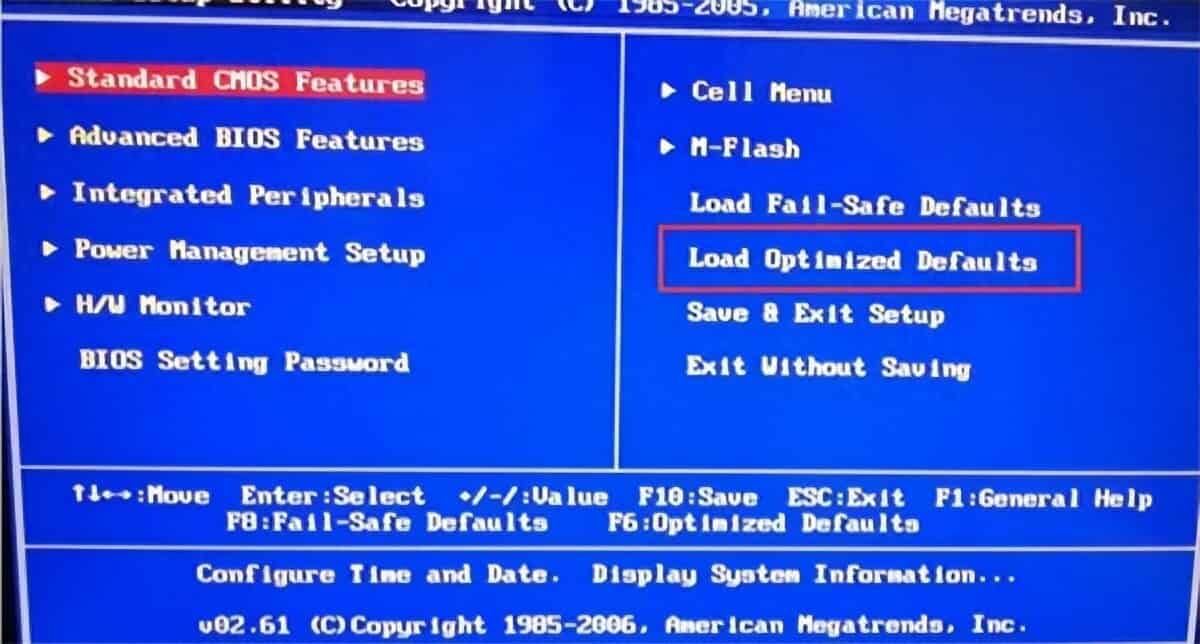
② On the interface, find and select ‘Load Optimized Defaults’ and press Enter, as shown in the image.
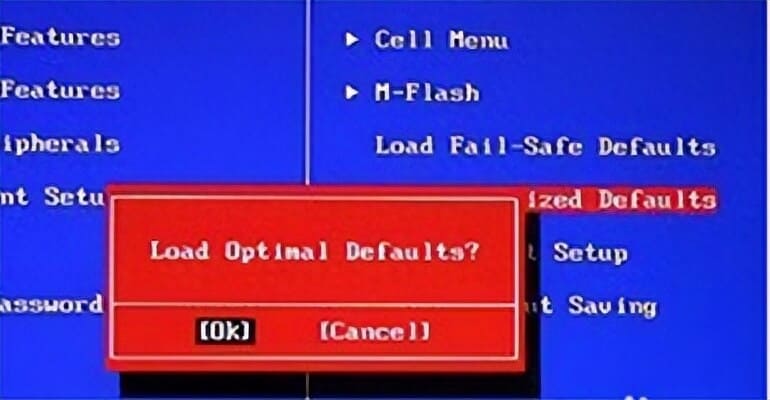
③ After pressing Enter, select OK in the prompt box, as shown in the image.
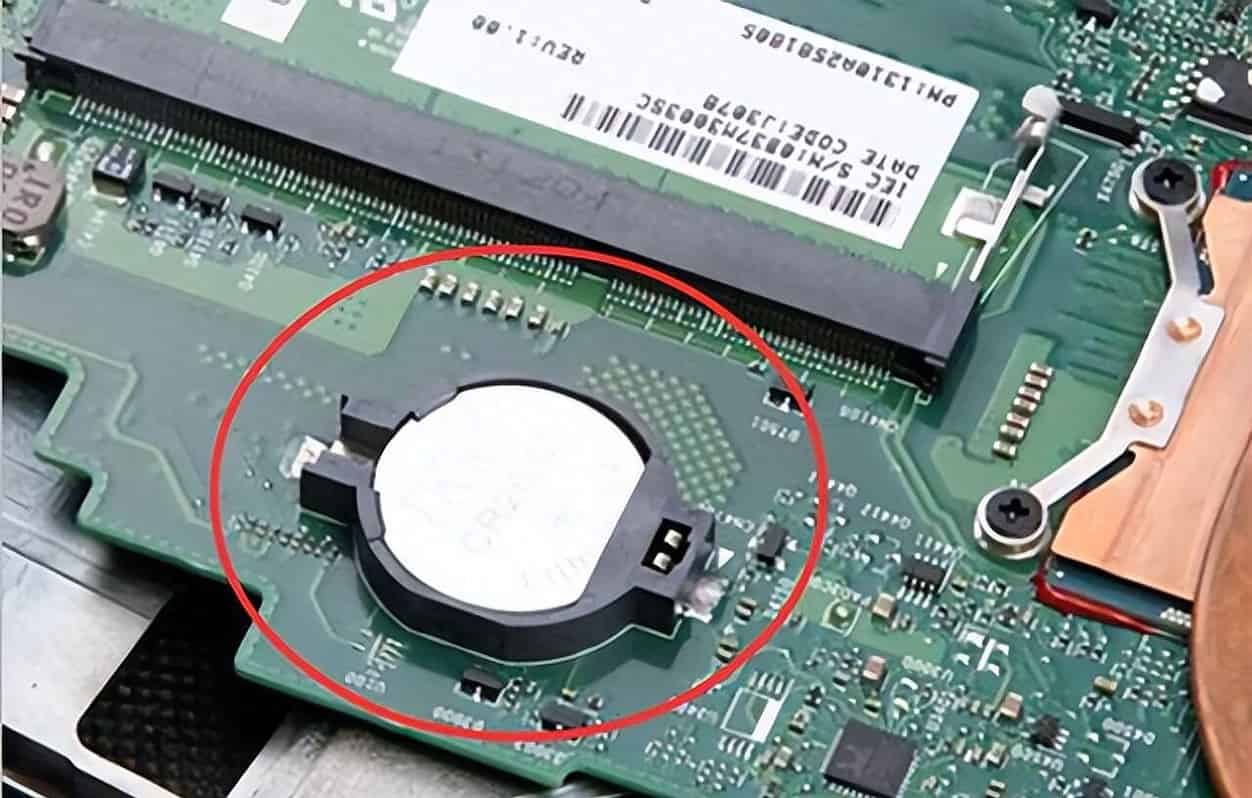
02
The Button Cell Battery is dead
If method 1 doesn’t work, you can simply replace the button cell battery on the motherboard. This is a straightforward process.
If you’re unsure about the cause, you can also restore the BIOS to its default settings.
After completing these steps, make sure not to forget to click on ‘Save & Exit’ to save your changes; otherwise, all the previous work will be in vain.”
03
Step-by-Step Guide to Fix F1/F2 Boot Issues
Follow these steps systematically to resolve F1 and F2 boot issues on your computer:
Step 1: Check Hardware Connections
Begin by ensuring that all hardware components, such as RAM, hard drive, and cables, are securely connected to your computer’s motherboard. Loose connections can trigger boot errors.
Step 2: Reset BIOS Settings
- Restart your computer and press the designated key (usually DEL or F2) to enter the BIOS settings.
- Locate the option to reset BIOS settings to their default values.
- Confirm the reset and save changes before exiting the BIOS.
Step 3: Update Drivers
- Access your computer’s Device Manager.
- Identify any devices with driver issues (indicated by a yellow triangle icon).
- Right-click on the problematic device and select “Update driver.”
Step 4: Scan for Malware
Install reputable antivirus software and perform a full system scan to detect and remove any malware or viruses that may be causing boot issues.
Step 5: Check for Software Conflicts
Review recent software installations or updates. Uninstall any suspicious or conflicting software, then restart your computer.
Step 6: Test with Minimal Hardware
Disconnect unnecessary peripherals and hardware components. Boot your computer with only essential devices connected to identify potential hardware conflicts.
Step 7: Repair Operating System
If none of the above steps resolve the issue, you may need to repair your operating system using your installation media.
Step 8: Seek Professional Help
If the problem persists despite your efforts, it’s advisable to seek assistance from a professional technician or your computer’s manufacturer.
04
Conclusion
Experiencing F1 and F2 boot issues can be challenging, but with this step-by-step guide, you have the tools to troubleshoot and resolve these problems on your own. Remember to take your time, follow the instructions carefully, and prioritize safety when working with computer hardware. By doing so, you can get your computer back to its optimal performance.
05
Frequently Asked Questions (FAQs)
Q1. What do F1 and F2 boot issues mean?
F1 and F2 boot issues are keyboard shortcuts that indicate errors or specific actions needed during the boot process of a computer.
Q2. Why does my computer keep asking me to press F1 or F2 during boot?
This could be due to hardware problems, loose connections, or corrupted BIOS settings.
Q3. Can I fix F1 and F2 boot issues on my own?
Yes, you can try troubleshooting using the steps outlined in this guide. However, if the problem persists, seeking professional help may be necessary.
Q4. How often should I update my drivers?
It’s a good practice to regularly update your drivers, especially after significant software or hardware changes.
Q5. What precautions should I take when working with computer hardware?
Always ensure the computer is powered off and unplugged before working with hardware components to prevent electrical shock or damage.
