
1. What is molding?
In one sentence:
Molding is the process of using high temperature to press a lump of thermosetting resin material into a mold, tightly encapsulating the chip, bonding wires, and lead frame, forming the final black “IC package shell” we see.
2. Purpose of molding
This step is highly significant—it’s much more than just “encapsulation”:
| Function | Description |
|---|---|
| Mechanical Protection | Prevents damage to the chip and bonding wires from external forces |
| Electrical Isolation | Ensures no short circuit occurs between internal electrical signals |
| Moisture/Contamination Protection | Blocks external moisture and dust from entering |
| Shape Formation | Forms a standardized shell for easier testing and mounting |
| Thermal Management | Some molding compounds help with heat dissipation due to thermal conductivity |
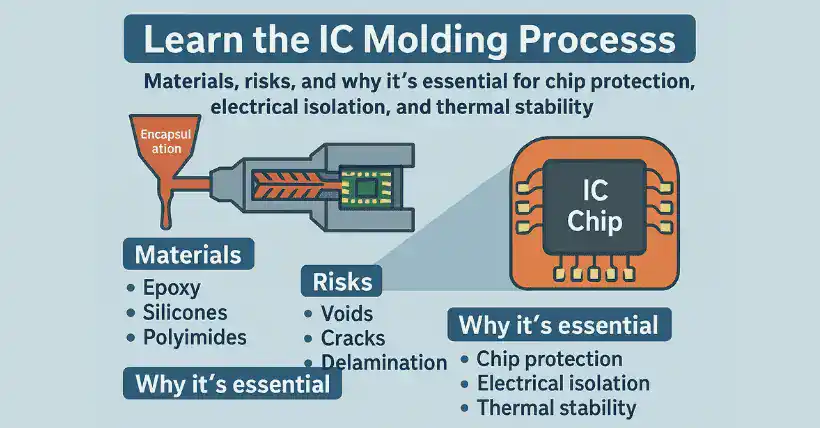
3. What is molding material?
Commonly used is epoxy resin (Epoxy Molding Compound, EMC), which includes fillers (like silica powder), flow agents, hardeners, flame retardants, etc. It flows like a liquid at high temperature and becomes a hard solid once cured.
4. Basic process of molding (step by step)
✅ Step 1: Mold preparation
Place the bonded lead frame into the mold cavity. The metal mold contains multiple cavities to define the package shape.
✅ Step 2: Heat the mold
Heat the mold to around 175°C, which is the working temperature where the molding resin begins to flow and react.
✅ Step 3: Inject molding compound
The molding material (in pellet or preformed sheet form) is softened by heating and pressed into the cavity via a plunger injection system, flowing through runners into each cavity.
Key factors: pressure + temperature + time coordination
Flow rate must be moderate:
- Too fast → breaks wires or displaces the chip
- Too slow → material starts curing before filling is complete, causing voids or incomplete corners
✅ Step 4: Initial cure in mold
The resin reacts under high temperature in the mold, achieving about 80% cure.
At this point, it’s hardened enough to hold shape but not fully reacted.
✅ Step 5: Demolding
After initial curing, the mold opens, the package is removed, and it enters a buffer stage before the next step (post mold curing).
5. Core parameters in molding (must be precise)
| Parameter | Control Requirement | Description |
|---|---|---|
| Mold Temperature | ~175°C | Too low = resin won’t flow, too high = premature curing |
| Resin Flow Rate | Precisely adjusted | Prevents wire displacement, breakage, or poor cavity filling |
| Gel Time | Precisely controlled | Must fill cavity before resin transitions from liquid to solid |
| Injection Pressure | Multi-stage pressure control | Gentle start to avoid wire damage, mid-stage for filling, final for degassing and compression |
6. Common quality risks in molding and consequences
| Risk Issue | Cause | Consequence |
|---|---|---|
| Wire sweep | Flow too fast | Wire breaks → electrical failure → package scrap |
| Voids/Bubbles | Incomplete fill or poor venting | Weak structure, poor heat dissipation, high failure rate |
| Off-center package | Mold design or positioning issue | Exceeds package dimension limits, affects mounting |
| Demolding failure | Resin fully cured inside mold | Mold jam, requires manual removal and halts equipment |
| Flash/Overflow | Over-injection or poor mold seal | Poor appearance, affects downstream processes or assembly |
7. Follow-up process: Post Mold Curing
Though about 80% curing happens in the mold, to ensure full material reaction, mechanical strength, and stress relief, the parts undergo post mold curing in an oven.
- Typical temperature: 150–175°C
- Time: 3–5 hours
This step is essential. Skipping it may lead to cracking, moisture-induced bursting, dielectric breakdown, etc.
8. Significance of molding for overall product reliability
Though it may seem like just “adding a shell,” molding actually determines the physical protection, electrical performance, and thermal stability of the package. It is a key process for yield control.
If molding fails, even perfect die attach and wire bonding can be completely wasted.
Summary flowchart: Key points of the molding process
Chip + wires bonded
↓
Mold preheated to 175°C
↓
Resin injected (controlled flow rate)
↓
80% cure in mold
↓
Demold
↓
Post mold curing (complete the remaining cure)
↓
Inspection → Singulation → Final test
Engineering Practical Advice
- Always perform Mold Flow Simulation before changing products
- Each batch of molding material must be verified for its flow curve and gel time
- If mold sticking occurs repeatedly, check the venting system, mold release agent, and temperature control system
Related:

Disclaimer:
- This channel does not make any representations or warranties regarding the availability, accuracy, timeliness, effectiveness, or completeness of any information posted. It hereby disclaims any liability or consequences arising from the use of the information.
- This channel is non-commercial and non-profit. The re-posted content does not signify endorsement of its views or responsibility for its authenticity. It does not intend to constitute any other guidance. This channel is not liable for any inaccuracies or errors in the re-posted or published information, directly or indirectly.
- Some data, materials, text, images, etc., used in this channel are sourced from the internet, and all reposts are duly credited to their sources. If you discover any work that infringes on your intellectual property rights or personal legal interests, please contact us, and we will promptly modify or remove it.